Friday, September 16, 2011

Chicken, Artichoke and Spinach Calzone

Yummm...This recipe is from the October/November 2011 issue of Cook's Country (one of our favorite cooking mags).  It is called Chicken, Artichoke and Spinach Calzone and it was wonderful!

Here is the recipe:

1 rotisserie chicken, skin discarded, meat shredded into bite-size pieces
9 oz frozen artichoke hearts, thawed, patted dry and chopped
2 oz (2cups) baby spinach
6 oz low-moisture mozzarella cheese, shredded (1 1/2 C)
4 oz feta cheese, crumbled (1 C)
1/4 C chopped fresh basil
1/2 tsp salt
1/4 tsp pepper
1 (1 pound) ball ready-made pizza dough
2 TBSP olive oil

1.  Adjust oven rack to upper-middle position and heat oven to 450 degrees.  Combine chicken, artichokes, spinach, mozzarella, feta, basil, salt and pepper in a bowl.

2.  Divide dough in half.  On lightly floured counter, roll dough into two 9-inch rounds.  Working one at a time, place half of filling over half of dough, leaving 1-inch border around edges.  Brush edges with water, fold dough over filling, and crimp to seal.  Repeat with remaining dough and remaining filling. 

3.  Brush rimmed baking sheet with 1 TBSP of oil.  Transfer calzones to prepared sheet and cut two 1-inch slits in top of each calzone.  Brush calzones with remaining 1 TBSP of oil and bake until golden brown, about 20 minutes.  Serve.

Test kitchen tip: the dough will be easier to roll if you let it sit at room temp for 5 minutes before rolling out.

Here are my pics of it:
Start of the process...I have taken the chicken apart and chopped the artichokes.

Prior to cooking the calzones.

Baked up and yummy!!!!


So cheers to a yummy, fast and pretty healthy dinner!

Monday, September 12, 2011

Elmo Cake

Okay so here is the process on the Elmo cake.  It took me about 3 days to do.  Baking and frosting making on one day, frosting the base and 1/2 of Elmo the 2nd day and finishing Elmo and finishing the cake on the 3rd day.

So here is the base cake in the pan getting ready to be baked:

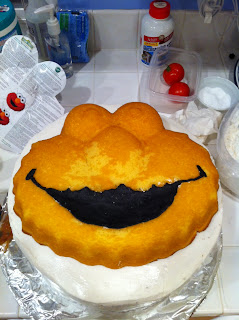
I made a yellow cake for the base as well as a chocolate cake.  So the base of the cake was two cakes high with white frosting in between and on the outside of the cake.  Then I baked Elmo and once he was cooled I popped him on top of the frosted base cakes.


Here is another view:


Then I started frosting Elmo himself...I started with his mouth:


Then I did his orange nose:


His eyes started with the white part and then I filled in the black pupils. 


I then mixed the red frosting to the color I wanted and started in on Elmo's head, but 1/2 way through I had to take a break because my hand was cramping up too much - so here is a shot of where I took a break:

Then as many of you saw here were the final pictures of the cake:


So cheers to Morgan turning two and having a "Melmo Cake" (which is how Morgan described her cake)!