Monday, January 3, 2011

The New Year is Here!

I can't believe it is 2011.  Is it me or does it seem like the years keep going by faster and faster?  I feel like we just said hello to 2010. 

This year I have many goals, but here are just a few:
  • finish Couch to 10K and actually do a run; I am signed up for the Shamrock 8K :)
  • try to have at least 2-3 servings of green veggies a day
  • sell dining room table and turn dining room into play room
  • organize the kids toys
  • spend less (in general on everything)
  • figure out how to get a gym membership - with childcare - into our monthly budget
  • turn 35 in style - Not sure if that will be in Las Vegas or not due to my previous goal about spending less on everything
We are off to Hawaii in less than two weeks, so my next few blogs might be about that/packing.  I am so excited I can barely stand it.  My goals for Hawaii are different from those above:
  • enjoy time spent with my family
  • drink as many Mai Tais as possible (without getting sick)
  • read a book (or two if I get the time)
  • keep up my running program even in Hawaii
So cheers to 2011!  Here is hoping for the best year yet!

Sunday, December 19, 2010

A Cake Pan and a Dream

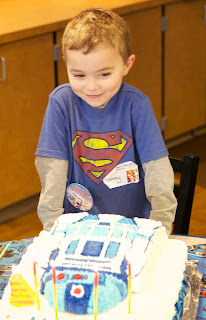
Okay so Tommy told me he wanted a Star Wars cake for his birthday...of course Lucas Films holds their copyrights very close, so I set out to figure out how get a Star Wars cake for his birthday.  So the next logical step...Google.  People in this world do amazing things for their children; there were a ton of cakes big and small - then I found the Wilton R2D2 pan.  Of course it was "retired" so the only way to get a hold of them is on Ebay.  So I called Mikey and said I need this pan, can you get it for me.  He asked me how much I was willing to pay for it and I said anything under $100.  We got the pan for $54.


The pan arrived and then I realized that actually meant I had to make Tommy's cake.  This is when I enlisted the help of premier cake makers Nana Cheryl Viale and Lisa Mitchell.  Nana Cheryl made Morgan's first birthday cake and it was wonderful so I knew I was in good hands.  I borrowed Lisa's 1/2 sheet cake pan and Nana Cheryl VERY kindly went to the Decorette Shop and bought me the proper supplies.

The cake pan came with a picture of the finished product and a detailed description of what we needed to do, so we were mostly set.  Now it was down to the baking.

I first made 4 batches of frosting.  It was quite the process but I finished that all in one night.  Then the next day, I baked the chocolate 1/2 sheet cake first and then I baked the yellow 1/2 sheet cake.  The R2D2 pan was the final cake to get ready.

Nana Cheryl came over and helped me frost first the chocolate layer, then we placed the yellow layer on top of that and frosted the entire thing with the white icing.  We then placed R2D2 on top of the finished 1/2 sheet cake.  It was time to start the artistic part of the journey.  We had to color three different blues for the R2D2 cake because he took white, dark blue, medium blue and light blue icing...so with a lot of  mixing involved we accomplished the different colors.

Then it was mostly paint by numbers...look at the picture and then put the colors in the proper sections.  Nana Cheryl helped me to the head of R2D2 and then we took a break.  I finished the rest of his body the next day. 


Then Nana Cheryl came over and helped me with the finishing touches and I made her write "Happy 4th Birthday Tommy" on the actual cake - because I am too shaky!  So here you go here are final pictures of the cake:


Thursday, December 9, 2010

Bow Tying Lesson

So many people always say, "How do you get your packages to look so nice?" and really the secret is the bow.  If you master the bow, the package can be wrapped in anything and no one will notice!  The bow makes the present!  So Lindsay, this post is for you!

Here it is (as promised)...hopefully I am not too goofy in this video...and hopefully it will help.  This is bow tying as my mother, Sue Hill, taught me how to do when I was younger.  If you need me to go slower and/or clarify anything please let me know.  Happy bow tying!

Tuesday, December 7, 2010

Gingerbread Houses - Assembly

Okay so Sunday was Gingerbread House assembly day.  In the morning I made a double batch of cement (or Royal) icing and put some of it in a piping bag (my only piping bag that I could find was stained pink from some red icing that I had previously done...but don't worry the icing was still white as white). 

Then I put the remaining icing in a Tupperware container.  The icing hardens very quickly when it is exposed to the air, so getting it in either a piping bag or an airtight container is very important. 

Then I moved to assembling 3 sides of the house along with the bottom.  We decided that since the kids were so young it would be good to have the sides solidified so they could put stuff inside their houses.  So I laid out the pieces as shown below - the bottom in the center, the two sides on the left and right and then the back at the top. 


Then I glued the pieces together with the cement icing.


Then Grandma Jan arrived in the afternoon with the candies, cups and lights for the houses and the real work began.  We set out all the candies.  Put out the cardboard cake rounds and doilies at each place at the table.  Then on top of those you place the three sided house.


Then once the house builders arrive, you put them to work.  Have several piping bags filled with cement icing and then go to work.  Grandma Jan would use her piping bag and say to Tommy "How about putting a tree here" and then dolloping a dot of icing as "glue."  When the kids are so young it is best to have one adult per house being built.  That way the adult can handle the bag of icing and the kids just get to place the candy on the house.  So have the house builder decorate the inside of the house. 


Once the inside is decorated, you can adhere the front of the house and then put on the roof.  You can always add more icing to decorate, so if it looks a little sloppy that is okay...you can fix it at the end.


Now you can decorate the outside of the house and the "yard."


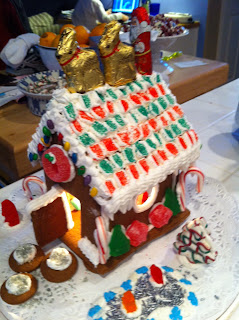
Here are our final products:


Tommy's House (Front)

Tommy's House (Rear view)


Morgan/Mommy's House (front)
Morgan/Mommy's House (Side View)

Trying to get the inside view of Morgan/Mommy's House

So really just have fun with it and develop your process on your own.  And don't worry if you mess up!  It is all for fun! 

Let me know if you have any questions or please share your own gingerbread house making stories!

Welcome!!!

Due to hopefully the Leeper Christmas Card arrival in your home (please tell me if you did not receive a card) I am hoping a lot more people are starting to visit my blog...so WELCOME! - Of course I do not want to offend my tried and true readers who have been with me since the start of this hair brained idea (okay it was not really that long ago-but I had to give you all a shout out because I am not sure I would write as regularly as I do if I did not think at least someone was reading it).  You original, supportive blog followers are why I decided to put my blog address on our Christmas Card. 

This blog is a place that I am excited to share what has been happening in the Leeper family.  So here I will be sharing memories, our family traditions and just basic stories about what is happening in our lives.

Upcoming blog posts (and hopefully the goal dates in parentheses):
  • Bow tying tutorial (Thursday)
  • Gingerbread House Decorating and Final Products (Friday)
  • Review of Portland Bagel Company - a place that just opened up by our house (Saturday)
Now I have been promising the bow tying tutorial for a while and have not fulfilled that yet...I promise I will get it done tomorrow night and posted by Thursday by the latest.  I have just been super busy and not had a moment to do that. Sorry Lindsay...I know you are looking forward to that one.

So again, welcome to anyone who is reading my blog for the first time and hopefully it will be somewhat entertaining!

Happy 7th day of December and I hope everyone is having a great holiday season!

Wednesday, December 1, 2010

Cheesy Basil-Stuffed Chicken Breasts

This is one of our favorite recipes and I love it because I can make it up to the point of adhering the bread crumbs to the chicken earlier in the day.  Then all you have to do is put the breadcrumbs on and put in the tomatoes - then pop it in the oven for 25-35 minutes.  It is from Cook's Country (which is one of our favorite cooking magazines/websites - I will do a post on the cooking magazines that we receive and LOVE later) http://www.cookscountry.com/

We also like this recipe because it is pretty simple with the amount of ingredients.  We generally pair it with rice and broccoli or asparagus. 

Cheesy Basil-Stuffed Chicken Breasts
Serves 4
Avoid thin chicken breasts for this recipe—they are difficult to stuff without tearing. Whole-milk block mozzarella will provide the creamiest filling; preshredded or part-skim mozzarella will also work, but the filling will be grainy. To make fresh bread crumbs, process 2 slices of hearty white sandwich bread in the food processor.

1
cup shredded mozzarella cheese (see note below)
1/4
cup minced fresh basil 
2
tablespoons heavy cream 
1
tablespoon fresh lemon juice 
3
cloves garlic , minced
4
boneless, skinless chicken breasts (6 to 8 ounces each)
3
tablespoons mayonnaise 
1
cup fresh bread crumbs 
2
tablespoons extra virgin olive oil 
1
pint cherry tomatoes , halved

1. Adjust oven rack to middle position and heat oven to 425 degrees. Combine cheese, 2 tablespoons basil, cream, lemon juice, 2 teaspoons garlic, 1/2 teaspoon salt, and pepper to taste in medium bowl.
2. Cut pocket in chicken breasts, stuff with cheese mixture, and seal (I just take a paring knife to the fattest part of the top of the chicken breast and then run a pocket on the inside of the breast - then seal it up with a skewer -  I just break them to fit the size of the pan). Transfer stuffed breasts to 13 by 9-inch baking dish and spread tops evenly with mayonnaise.
3. Combine bread crumbs, remaining garlic, remaining 2 tablespoons basil, and 1 tablespoon oil. Sprinkle crumb mixture over chicken, pressing lightly to adhere.
4. Toss tomatoes with remaining tablespoon oil, 1/2 teaspoon salt, and pepper to taste. Arrange in baking dish around chicken. Bake until crumbs are golden brown and thickest part of chicken registers 160 degrees on instant-read thermometer, about 25 minutes. Serve.

Here are our pictures from tonight:
I forgot to take pics of the process (I am working on it), but here is the finished product...one chicken breast with roasted cherry tomatoes around it.

My dinner plate with the chicken, broccoli and rice with peas.  Yummy!

Here is a cross-section of the chicken.

And the delightful pinot that we had with it.


Also this is probably time to mention that everyone needs a ThermaPen in their household.  I am fairly certain that Mike has a few stashed around the house, but it is honestly the best instant-read thermometer out there!  So go get one: http://www.thermoworks.com/products/thermapen/splashproof_thermapen.html  (It is a great Christmas/Holiday gift and honestly it is the only thing that allows me to cook chicken to the correct temperature).  So I would say imperative to good meat cooking. 

Good cooking to you!!!

Monday, November 29, 2010

Gingerbread Process (Courtesy of Grandma Jan)

From the time I was a kiddo, I remember hearing stories from Mike about the Gingerbread Houses that he and his family made.  I was always in awe of this because I LOVE gingerbread and the houses were always so beautiful.  Another thing that was enticing was the cups of different kinds of candy that were always spread out on the kitchen table to decorate with...as many of you know I have a major sweet tooth! 

Side note in all of this: In high school I went over to Mike's house to do something...for the life of me I cannot remember what (pick him up to head to Dr. Munchies, do homework or one of those things you do in high school, but I have the best memory of seeing all the candy cups on their kitchen table and thinking what a wonderful tradition.  I want to make amazing gingerbread houses with my own family some day.  Never in my wildest dreams did I think it would actually be with Mike's family - I am so lucky how that worked out!

So now that I am married into the family, Grandma Jan has shared her tradition with me.  I am so excited.  Last year was my first year of participating in this tradition and it was so much fun! 

Okay I will try to remember everything, but Grandma Jan if I forget anything, let me know:
1.  Find a recipe and plans for the type of house you want to make.  I found several gingerbread websites out there and I am sure there are more, aside from the quick google search I did.  This is one that I found that had a recipe and a blue print: http://www.celebrating-christmas.com/recipes/gingerbread-house.shtml

2.  Cut stencils out of the house parts.  I traced them onto paper and then cut them out of cardboard.

3.  Make the gingerbread dough.  Refrigerate overnight.
4.  Roll the dough out (we did it on my mother-in-law's Silpat) and then cut out the dough in the shape of the stencils.  For the house we are building (which is called a moon house) we needed two front/back pieces, two sides, two roof pieces and one base.  We cut a hole in the base to put a light in (the kind of light you see in those porcelain Christmas Houses).  And we  cut holes in the sides for windows and on the front panel we cut a door.  For the holes we used the smallest round cookie cutter I own and Grandma Jan free-handed the door cut.  Make sure to try and straighten the sides prior to baking.  Also spray the cookie sheet with a bit of PAM or however you choose to grease your pans so the pieces do not stick.  Then we baked the pieces at 350 degrees F for about 12 minutes. 
5.  Prior to next weekend's assembly I have errands to run:
  • Pick up any candy that looks good for decorating (Small colorful items) - Grandma Jan keeps the candy in a tub in small clear plastic cups with saran wrap over them.  She also has the plans, lights, cardboard cake rounds and doilies in that box so it is ready to go.
  • Get sugar ice cream cones as they look great as trees when you put some icing on them and then roll in dusting sugar.
  • Buy some more tips and couplers at the cake decorating store (Grandma Jan has the piping bags and one tip/coupler in her tub. 
5.  Next weekend we will assemble the houses.  I will need to make the cement icing and because our kids are little, I will assemble three sides of the houses the night before so the kids can decorate the inside of the house without it falling over. 
6.  Then we will put on the front and roof - then we can go crazy decorating the outside of the house and the "yard."
7.  I will update you on the assembling of the houses after Sunday.

Here are some pictures from last year's assembly:
(Putting the finishing touches on Tommy's 2009 house)

(The finished product - Tommy's 2009 Gingerbread House)